


In this tutorial, we will create a RESTful API using Spring-boot and build an Angular client to consume services offered by our API.
We will start by making up a simple RESTful API that stores a model 'Person' in the database and also retrieves all persons.
Let's do that by following these steps:
Prerequisite: You need to have java 11 and maven installed.
- Use start.spring.io to generate a Spring-boot project and import it into your favorite IDE (IntelliJ in my case).
- Create the model.
- Create the repository.
- Create the service.
- Create the controller.
- Test the API using Postman.
Let's get into this!
Generating Spring-boot project:
Go to start.spring.io and generate a project like this:
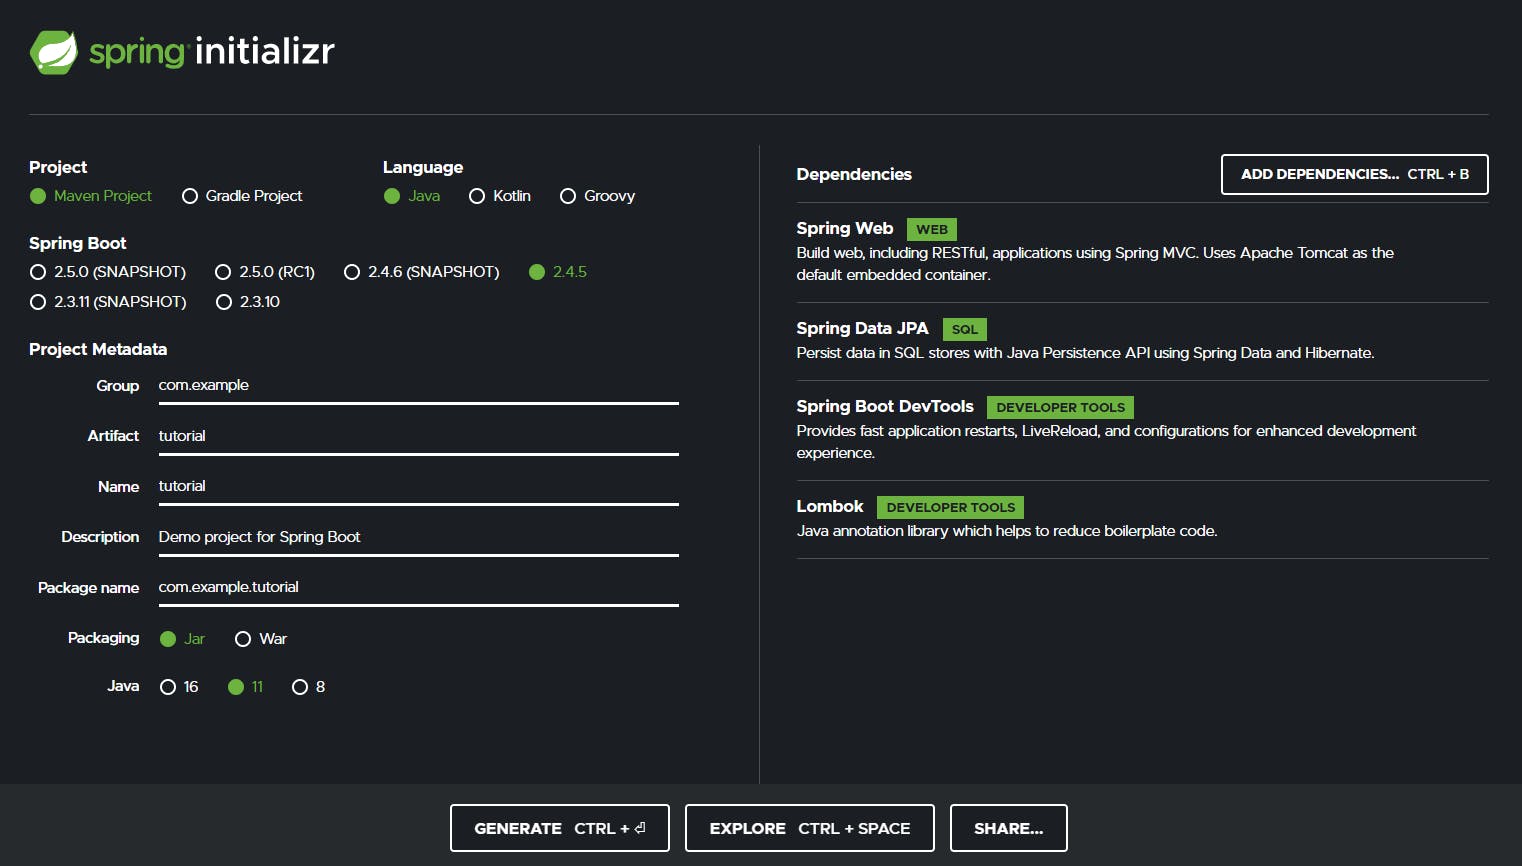
After unzipping the generated project, import it into your IDE.
Create the model:
package com.example.tutorial.model;
import lombok.Data;
import javax.persistence.*;

@Data
@Entity
@Table(name = "Person")
public class Person {
    @Id
    @GeneratedValue(strategy = GenerationType.IDENTITY)
    private Long id;
    private String firstName;
    private String lastName;
    private int age;
}
- @Data is a Lambock annotation that generates getters and setters implicitly for us so we don't have to do it manually.
- @Entity to indicate that this is a persistable bean.
- @Table to indicate the table that will store this entity in the database.
Create the repository:
package com.example.tutorial.repository;
import com.example.tutorial.model.Person;
import org.springframework.data.jpa.repository.JpaRepository;
import org.springframework.stereotype.Repository;

@Repository
public interface PersonRepository extends JpaRepository<Person, Long> {

}
@Repository indicates to spring that it's a repository class and since we are using JPA then it extends JpaRepository. We inherit all basic database operations from JpaRepository (save, findById, findAll...)
We will use a MySQL database, so to be able to do that we need to add MySQL dependency to the pom.xml file.
After that, we need to create our database (I called it 'person_db'). Then we set our Spring-boot application to be able to connect to the database. For that, we add this configuration to the 'application. properties' file.
## Database Properties
spring.datasource.url = jdbc:mysql://localhost:3306/person_db?useSSL=false&useJDBCCompliantTimezoneShift=true&useLegacyDatetimeCode=false&serverTimezone=UTC
spring.datasource.username = root
spring.datasource.password = root


## Hibernate Properties
# The SQL dialect makes Hibernate generate better SQL for the chosen database
spring.jpa.properties.hibernate.dialect = org.hibernate.dialect.MySQL5InnoDBDialect

# Hibernate ddl auto (create, create-drop, validate, update)
spring.jpa.hibernate.ddl-auto = update
Create the service:
package com.example.tutorial.service;
import com.example.tutorial.model.Person;
import com.example.tutorial.repository.PersonRepository;
import org.springframework.beans.factory.annotation.Autowired;
import org.springframework.stereotype.Service;
import java.util.List;

@Service
public class PersonService {

    @Autowired
    private PersonRepository personRepository;

    public Person save(Person person) {
        return personRepository.save(person);
    }

    public List<Person> findAll() {
        return personRepository.findAll();
    }
}
- @Service to indicate to spring that it's a service class.
- Since we are going to use the repository in the service so we need to inject it, that what @Autowired do.
Create the controller:
package com.example.tutorial.controller;
import com.example.tutorial.model.Person;
import com.example.tutorial.service.PersonService;
import org.springframework.beans.factory.annotation.Autowired;
import org.springframework.web.bind.annotation.GetMapping;
import org.springframework.web.bind.annotation.PostMapping;
import org.springframework.web.bind.annotation.RequestBody;
import org.springframework.web.bind.annotation.RestController;
import java.util.List;

@RestController
public class PersonController {

    @Autowired
    private PersonService personService;

    @PostMapping("/person")
    public Person save(@RequestBody Person person) {
        return personService.save(person);
    }

    @GetMapping("/persons")
    public List<Person> findAll() {
        return personService.findAll();
    }
}
- @RestContoller to indicate that it's a REST API controller that will manage HTTP requests.
- We inject the service using @Autowired.
- @PostMapping("/person") will handle HTTP POST requests from the client with a Person object that we desire to save.
- @GetMapping(/persons") will handle HTTP GET requests to retrieve all the persons from the database.
At this step, our RESTful API is ready to use.
Test the API using Postman:
We launch our Spring-boot application and open Postman.
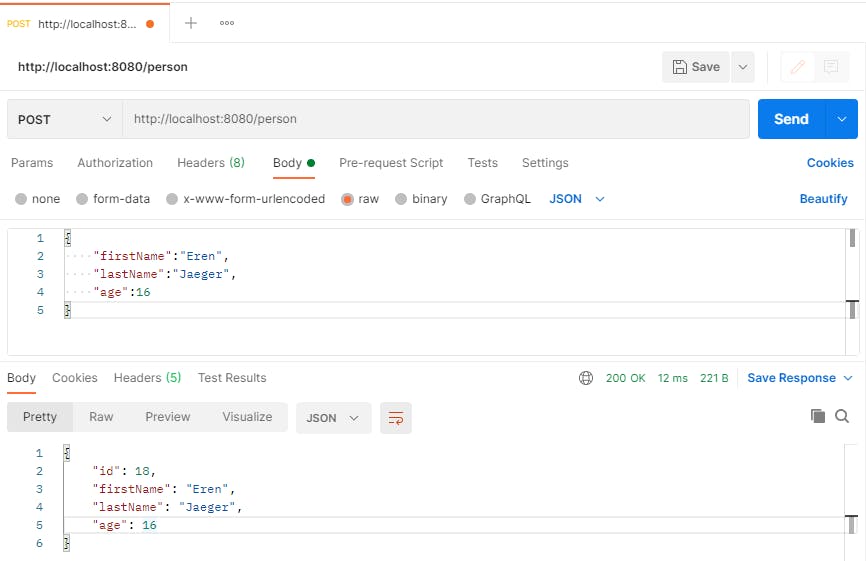
- Testing save request:
Send an HTTP POST request with a Person object in JSON format and it returns the same object with an ID. That means that the savings have been successfully done.
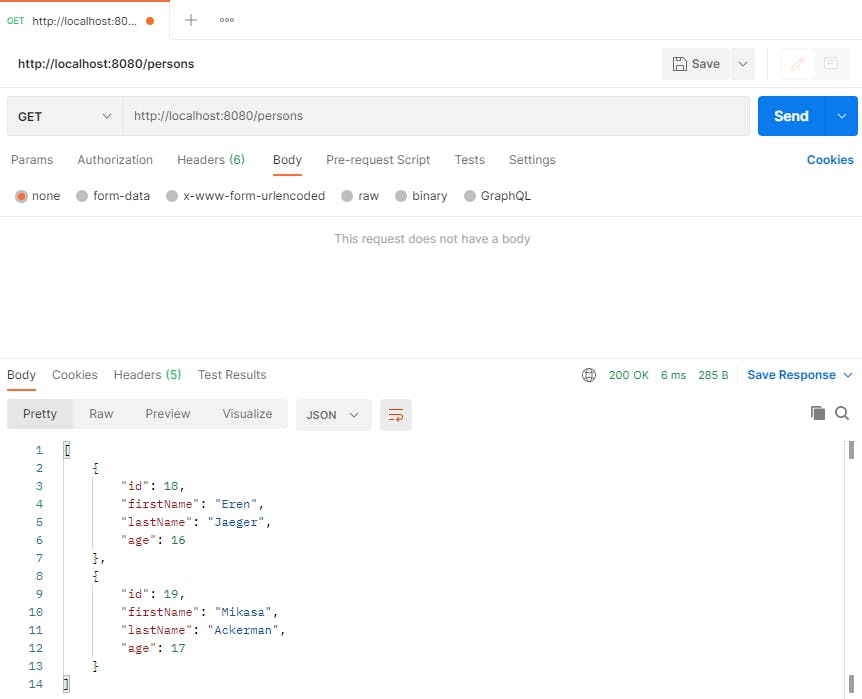
- Testing findAll request:
Send an HTTP GET request and it returns all the persons existing in the database.
The next step will be to implement a web UI to use this API and that's what we will see in part 2 of this tutorial.
So stay tuned...
If you found this article useful and you'd like to contribute to my content creation, feel free to buy me a coffee 😊
And let's connect on Twitter: elyamarouane